Boy, fall is taking its sweet time getting to us in Boston. Ready for some color, Yo!!
I am almost OVER making autumn cards, and am ready to get a move on with my Christmas cards. ALMOST, I said. I actually have some autumn stamps that have yet to be inked up. Mr. Cardmaker would NEVER let a season go by without inking up ALL of his new stamps.
That reminds me, I need to do just a few dozen more Halloween cards to make that a true statement. DANG YOU, AC Moore Dollar Bin!!! Dang you, and all of your $1 too-cute-to-pass-up Halloween goodness!!!!
ANYWAY---
I had some scraps all over my floor from the rosette banner project I did (more on that later). I decided they were just too good to throw away (like most of my scraps).
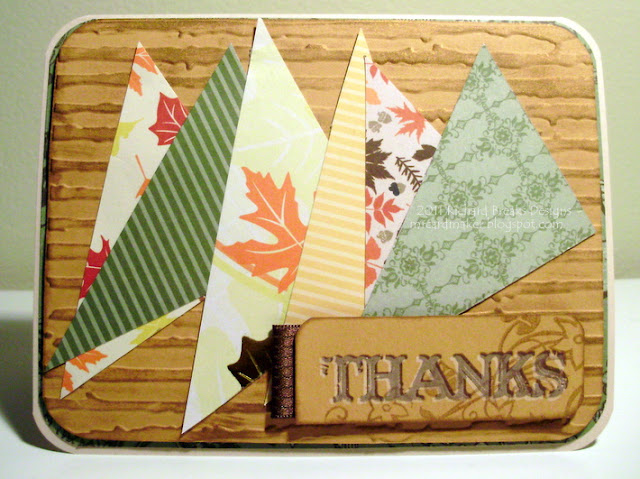
So, I made this--
This was made on a beige base, cardstock from The Paper Co. I layered some DP from Me & My Big Ideas, then some SU Mostly Mustard cs run thru my Cuttlebug with a Sizzix embossing folder. I inked that up with some brown ink for some depth. I popped that off the DP with some foam tape.
I gathered up my scrap DP (SU, M&MBI, and some Target "no name") and arranged and adhered them just as they were; no extra cutting. Then I cut out, edged, and stamped the sentiment (Studio g). I stamped it twice, once in brown, and once in white to give it some pop. I added a swirl from another Studio g set to give it some "somethin'-somethin'.
I added a little loop of ribbon to the back, and attached it with some more foam tape.
Easy-Peasy.
THEN--
StampTV did a "Red and Kraft" challenge for their "Mix-it-up Monday" challenge. I had just won GinaK Designs' "Garden Fresh" stamp set during a blog hop, so I decided to bust it out and get inky with it.
I made this--
This could not have been easier or more fun. I stamped some GinaK Designs Kraft CS with the apple stamp in Versamark, and used some (really old) red embossing powder to get them nice and shiny. (Gotta love a shiny red apple!)
I then used some crayola markers to re-ink the stamp, and I stamped it on some white CS, and cut it out. I like to leave a little white area around most images I cut out. I think it looks good, and it's often MUCH easier to cut.
I stamped the sentiment on another piece of white CS in Memento Tuxedo Black, and used the green marker I used on the apple leaf to hand draw the border.
I attached some Baker's twine to the back, added some foam tape to the back, and adhered it, using my two-way glue pen to attach the twine to the card base.
I added some foam tape to the apple image, and adhered it to the sentiment.
Easy as pie.
Mmmmmmm, apple pie. SO glad we went apple picking this weekend!!!
So, that's me for now. I have some autumn birthday cards to share with you next time.
Thanks so much for stopping by!
All Best-
Richard


These are great! I absolutely LOVE that apple card! So cute!
ReplyDeleteMmmm...you had me at Apple Pie...Great cards, Richard! Good idea embossing those apples, and it's always SO much fun to use up those scraps! The sentiment on your first card is awesome - double stamping like you did makes it look like it is stamped into leather. Thanks for sharing!
ReplyDeleteAwesomely unique! When I first saw your first project, I could have sworn it was a wood base and the sentiment was tooled leather. What a fun way to use scraps! Hope you are well. . .Best, Curt
ReplyDeleteWow Great Cards on your blog. Love the apples!
ReplyDeleteWow, great cards. I love that you use scraps to make the first card. Thanks for sharing.
ReplyDelete